2024
Crafts Older Kids
Most sculpture in the round is fixed to a base, and it doesn't move, but American artist Alexander Calder changed that when he invented the mobile in the early 1930s. While his mobiles were usually hung in an open space, sometimes he created standing mobiles. The butterfly mobile described here mounts on a base, too. It requires just a few materials that most everyone has around the house, and it will make a great Mother's Day gift!
Supplies Needed
- Scratch paper
- Pliers
- Rice paper or other absorbent paper
- Lightweight cardboard
- Thin, wire coat hanger
- Block of wood
- Clothespin
- Pipe cleaner
- Wax paper
- Watercolors or acrylics
- Floral tape
- Paint brush
- Water pan
- Scissors
- Staple gun
- Newspapers
- White glue
- Pencil
Method
1. You can use your imagination to create a fantasy butterfly, as we did, or study photos of butterflies to learn how to make more realistic insects. Butterflies occur in a variety of shapes and colors, and their wings have beautiful markings. One thing they have in common, however, is the symmetry of their wings. That is, the size and shape of one side or half matches the other.
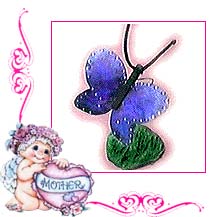 1. You can use your imagination to create a fantasy butterfly, as we did, or study photos of butterflies to learn how to make more realistic insects. Butterflies occur in a variety of shapes and colors, and their wings have beautiful markings. One thing they have in common, however, is the symmetry of their wings. That is, the size and shape of one side or half matches the other.
2. The easiest way to make sure that your butterfly will be symmetrical is to draw one-half of the insect on a folded piece of paper, with the body touching the fold. Keeping the paper closed, cut out the wings.Trace this shape on cardboard, and cut it out.
3. Our fantasy butterfly was made by first painting a wet-in-wet watercolor. Before starting, protect the table with a layer of newspapers, and place a sheet of wax paper on top. Put a piece of rice paper on top of the wax paper, and soak it with water. Paint the paper, letting the colors flow into each other. Be sure to use lots of paint, because watercolor tends to dry lighter than it appears as you work.
4. When the paper is dry, turn it face down, and trace the cardboard butterfly. Now lay the pattern on another area, trace it again, and add a margin of at least 1/2" all the way around the shape. Clip the margin at 1/2" intervals up to the traced shape. Put a thinned coating of glue on the pattern, and paste it to the wrong side of this paper. Now, one at a time, put glue on each tab and fold it over so that you cover the edge of the cardboard. Glue the other piece of painted paper to the bottom of the butterfly. Gently shape the wings while the cardboard and paper are damp.
5. To make the body, paint the clothespin black. When it's dry, make a hole in the underside with a drill or awl, and slide it over the wings.To keep it in place, pack the underside opening of the pin with small scraps of cardboard. Choose a dark colored pipe cleaner for the antennae. Fold it in half, and twist the center around the head of the clothespin to fasten it. Shape the antennae.
6. After the butterfly is finished, you're ready to attach it to the base with the coat hanger. Decide how tall you want the mobile to be, and use pliers to remove the hook portion and some additional length from the hanger. If you wish, cover the wire with floral tape, and bend it into a spiral or zigzag shape. Insert one end of the wire in the body, and staple the other end onto the block. Paint the wood a color which complements the butterfly, and if you wish, decorate the base with dried moss and flowers. Place the butterfly in a breezy area, and surprise your mom for Mother's Day!
Make a Tray for Mother's Day
If you'd like to make mom a special gift, you can recycle a small picture frame to make an attractive tray. It will be just the right size to keep small items organized on her vanity.
We'll make the tray by using papier mache, a technique in which strips of newspapers are pasted onto the frame. For centuries making paper was limited and expensive, so recycling the material to make new products was a practical application of papier mache.
Supplies Needed
- Used picture frame
- Mat board
- Wax paper
- Felt
- Rubber bands
- Masking tape
- White glue
- Fabric glue
- Wallpaper paste
- Gesso
- Acrylic paints
- Paint brushes
- Pans for paint and paste
- Dowel rod scraps
- Mat board scraps
- Cotton swabs
- Ruler
- Scissors
- Utility knife
- Newspapers
Method
1. Making a small tray is a great way to recycle an old or damaged picture frame. Since the entire frame will be covered, no one will notice the flaws. If you don't have a frame available, look for one at garage sales or try your local thrift store. If the glass is still in place, have an adult remove it and set it aside. Measure the rabbet or groove inside the frame, and cut pieces of mat board to fit. You'll need many pieces, because it will be necessary to fill the frame from front to back. Measure the back of the frame and cut one larger piece of mat board to cover it.
2. Glue all the smaller pieces of mat board together, and put rubber bands around them to hold them in place for a few minutes. Remove the bands, and glue the boards inside the frame where the glass would normally fit. If necessary, add more mat board to fill the frame.Finally, glue the larger sheet of mat board onto the back of the frame,and add some strips of masking tape all around to help hold it in place.Protect the table with newspapers, and work on a sheet of wax paper to prevent gluing your project to the newspapers.
3. Mix the wallpaper paste according to manufacturer's directions. Tear the newspaper into small squares or short strips, and begin pasting them to the tray form. Dip the paper into the mixture, and remove the extra paste by running the strip between your fingers and thumb. Apply one layer over the entire tray, front and back. When dry, apply a primer coat of gesso to the sides, top, and inside of the form. It's not necessary to prime the back, because it will be covered with felt.
4. Painting a design on the tray is the fun part of this activity. You can paint the entire form one color, and then apply surface decoration on top of this base coat. To make the tray more interesting, however,you might want to use several colors. Before you start, look at the form to see if there are any definite shapes or borders suggested by the picture frame beneath the paper surface. You can paint the large area in the center one color and paint the frame portion one or more colors, for example. Also, paint a small strip of color all around on the back of the tray to hide any paper which the felt may not cover.
5. After the base coat is dry, you're ready to apply the surface decoration to the entire frame. Rather than painting something realistic, consider using a design. It's easy to get ideas on good design elements by looking at patterns in printed fabric and paper such as those found in drapery and wallpaper. Another way is to study other cultures and use their painting techniques to inspire your work. Can you imagine painting without a brush? The aborigines of Australia have been painting beautiful dot designs with sticks for thousands of years!
6. You can try your hand at stick painting by using short lengths of dowel rods, cotton swabs, or similar materials. To begin, look at the tray to see if there are any "natural" shapes or borders that could be decorated by stick painting. Dip the stick into a color, and apply it to the tray. Repeat until this area is covered with a design.Another way to decorate the surface is to dip the edge of a small piece of mat board into paint and apply it to the form. When you've finished painting, set the tray aside to dry. Complete the project by attaching felt to the back with fabric glue.
Tips and Tricks:
1. Your picture framer may share used or damaged frames with you. He or she often has a supply on hand, because customers who bring work in for reframing don't want their old frames returned. Also the framer may donate odd scraps of mat board for your project.
2. You can substitute other heavy cardboard for mat board. A paper cutter is an ideal tool to use in cutting the material to the sizes you'll need. Whether you're using a utility knife or a paper cutter,however, always have an adult do the cutting for you.
3. While it's not essential, one coat of gloss acrylic varnish applied to the finished tray will make it more attractive and durable.
Potholder for Mother's Day
This would make a sweet gift for your darling mom.
Things Needed
White pot holders
Permanent markers
Colors
Colored Stick Ons
- First decide a simple design for the potholder.
- First draw the picture on a piece of paper and then copy it onto the potholder.
- Use permanent markers to draw the picture onto the potholder and use colors to make it more attractive.
- Phrase like 'Mom I Love You' can be written in the middle.
- Make sure to put the date on the back.
Flower Ribbon Pin Craft
Things Needed
Ribbon - 1 ½ inches wide
Florist wire
Green chenille stems
Buttons
Pompoms or fun foam.
Pin back
- Using the florist wire, punch a hole in the ribbon on one side.
- Continue weaving the wire in and out down one side of the ribbon bunching up the ribbon as you go. When you have enough ribbon on the wire to form a flower, cut the ribbon and bring the two ends of the ribbon together.
- Wind the ends of the wire around each other and cut off any excess.
- Stick on a button and pompom at the center of the flower.
- Use a green chenille stem to form a stem and leaves
- Attach the stem to the back of the flower.
- Stick a pin back at the back of the flower.
Bouquet in Hand Craft
This is a simple hand craft item which can really create a good piece with the use of paint, markers or construction paper.
Things Needed
Light-colored construction paper for the background
Skin colored construction paper for hand
Scissors
Glue
Colors
- Cut the skin-colored paper in hand shape.
- In another piece of paper, glue the palm of the hand to the lower left part of the paper.
- Using colors draw the stems of the flowers. Start each stem on the hand and have it go towards the center of the paper.
- Stick the fingertips of the paper onto the palm and the stems of the flowers (to show as flowers are held in the hand).
- Draw flowers and leaves on the stems. Flowers made from colorful construction paper can also be stick upon.
- A special Mothers Day bouquet is ready.
- Mother's Day Quotes
- Mother's Day Messages
- Mother's Day SMS
- Mother's Day Essay
- Mother's Day Speech
- Mother's Day Wishes
- Mother's Day Whatsapp Msg
- Mother's Day Cards
- Mother's Day Songs
- Mother's Day Trivia
- Mother's Day Games
- Mother's Day Crafts
- Mothers Day Party Ideas
- Mothers Day Decoration
- Mother's Day Humor
- Mother-in-Law Jokes
- Mother in Different Languages
- Short Stories on Mothers
- Famous Mom Sayings
Mother's Day History
A mother is a God’s reflection. Mother’s Day is a splendid occasion to express and convey deepest love, regards and gratitude for everything she has done for us. To know more about this day’s history, click here...Know More
Mother's Day Mexico
Mexican food is every foodie’s delight! But, the beautiful country of Mexico is also known for its celebration in special days. Mother’s Day is a heartwarming event celebrated with great pomp and show in Mexican style. Click here to know more.....Know More


